Part 4

JavaScript: Window, Document & Form Objects

JavaScript is an object-oriented (or, as some would argue, object-based) language.

An object is a set of variables, functions, etc., that are in some way related. They are grouped together and given a name

Objects may have:

  Properties
 
    A variable (numeric, string or Boolean) associated with an object. Most properties can be changed by the user.
 
    Example: the title of a document
 
  Methods
 
    Functions associated with an object. Can be called by the user.
 
    Example: the alert() method
 
  Events
 
    Notification that a particular event has occurred. Can be used by the programmer to trigger responses.
 
    Example: the onClick() event.


Internet browsers contain many objects. In the last few years the object structure of internet browsers has become standardised, making programming easier. Prior to this, browsers from different manufacturers had different object structures. Unfortunately, many such browsers are still in use.

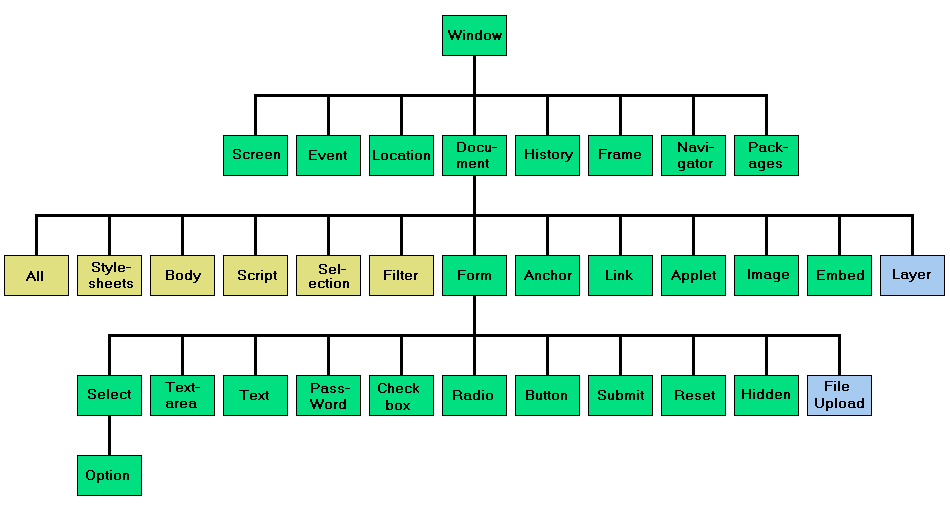
The objects are arranged into a hierarchy as shown below:

The Document Object Model. Objects shown in green are common to both Netscape Navigator and Internet Explorer; objects shown in yellow are found only in Internet Explorer while objects shown in blue are found only in Netscape Navigator.

The hierarchy of objects is known as the Document Object Model (DOM).


The Window Object

Window is the fundamental object in the browser. It represents the browser window in which the document appears

Its properties include:

  status The contents of the status bar (at the bottom of the browser window). For example:
 
  window.status = "Hi, there!";
 
  will display the string "Hi, there!" on the status bar.
    Click here to see this line of code in operation.
       
  location The location and URL of the document currently loaded into the window (as displayed in the location bar). For example:
 
  alert(window.location);
 
  will display an alert containing the location and URL of this document.
    Click here to see this line of code in operation.
 
  length The number of frames (if any) into which the current window is divided. For example:
 
  alert(window.length);
 
  will display an alert indicating the number of frames in the current window.
 
  See under parent (below) for an example.
  parent The parent window, if the current window is a sub-window in a frameset. For example:
 
  var parentWindow = window.parent;
alert(parentWindow.length);
 
  will place a string representing the parent window into the variable parentWindow, then use it to report the number of frames (if any) in the parent window.
 
  Click here to see an example of the use of parent and length.
 
  top The top-level window, of which all other windows are sub-windows. For example:
 
  var topWindow = window.top;
alert(topWindow.length);
 
  will place a string representing the top-level window into the variable topWindow, then use it to report the number of frames (if any) in the top-level window.
 
  top behaves in a very similar way to parent. Where there are only two levels of windows, top and parent will both indicate the same window. However, if there are more than two levels of windows, parent will indicate the parent of the current window, which may vary depending upon which window the code is in. However, top will always indicate the very top-level window.


Window methods include:

  alert() Displays an 'alert' dialog box, containing text entered by the page designer, and an 'OK' button. For example:
 
  alert("Hi, there!");
 
  will display a dialog box containing the message "Hi, there!".
    Click here to see this line of code in operation.
       
  confirm() Displays a 'confirm' dialog box, containing text entered by the user, an 'OK' button, and a 'Cancel' button. Returns true or false. For example:
 
  var response = confirm("Delete File?");
alert(response);
 
  will display a dialog box containing the message "Delete File?" along with an 'OK' button and a 'Cancel' button. If the user clicks on 'OK' the variable response will contain the Boolean value true, and this will appear in the 'alert' dialog-box; If the user clicks on 'Cancel' the variable response will contain the Boolean value false and this will appear in the 'alert' dialog-box.
    Click here to see this code in operation.
 
  prompt() Displays a message, a box into which the user can type text, an 'OK' button, and a 'Cancel' button. Returns a text string. The syntax is:
 
  prompt(message_string, default_response_string)
 
  For example:
 
  var fileName = prompt("Select File", "file.txt");
alert(fileName);
 
  will display a dialog box containing the message "Select File" along with an 'OK' button, a 'Cancel' button, and an area into which the user can type. This area will contain the string "file.txt", but this can be overwritten with a new name. If the user clicks on 'OK' the variable fileName will contain the string "file.txt" or whatever the user entered in its place, and this will be reported using an alert dialog box.
    Click here to see this code in operation.
 
  open() Opens a new browser window and loads either an existing page or a new document into it. The syntax is:
 
  open(URL_string, name_string, parameter_string)
 
  For example:
 
  var parameters = "height=100,width=200";
newWindow = open("05_JS4nw.html", "newDocument", parameters);
 
  will open a new window 100 pixels high by 200 pixels wide. An HTML document called '05_JS4nw.html' will be loaded into this window.
 
  Note that the variable newWindow is not preceded by the word var. This is because newWindow is a global variable which was declared at the start of the script. The reason for this is explained below.
 
    Click here to see this code in operation.
 
  close() Closes a window. If no window is specified, closes the current window. The syntax is:
 
  window_name.close()
 
  For example:
 
  newWindow.close()
 
  will close the new window opened by the previous example.
 
  Note that the window name (i.e., newWindow) must be declared as a global variable if we want to open the window using one function and close it using another function. If it had been declared as a local variable, it would be lost from the computer's memory as soon as the first function ended, and we would not then be able to use it to close the window.
 
    Click here to see this code in operation.


Window events include:

  onLoad() Message sent each time a document is loaded into a window. Can be used to trigger actions (e.g., calling a function). Usually placed within the <body> tag, for example:
 
  <body onLoad="displayWelcome()">
 
  would cause the function displayWelcome() to execute automatically every time the document is loaded or refreshed.
       
  onUnload() Message sent each time a document is closed or replaced with another document. Can be used to trigger actions (e.g., calling a function). Usually placed within the <body> tag, for example:
 
  <body onUnload="displayFarewell()">
 
  would cause the function displayFarewell() to execute automatically every time the document is closed or refreshed.


The Document Object

The Document object represents the HTML document displayed in a browser window. It has properties, methods and events that allow the programmer to change the way the document is displayed in response to user actions or other events.

Document properties include:

  bgColor The colour of the background. For example:
 
  document.bgColor = "lightgreen";
 
  would cause the background colour of the document to change to light-green.
    Click here to change the background colour of this document.
  Click here to change it back again.
       
  fgColor The colour of the text. For example:
 
  document.fgColor = "blue";
 
  will cause the colour of the text in the document to change to blue.
    Click here to change the foreground colour of this document.
  Click here to change it back again.
 
  (Note that this will not work with all browsers).
 
  linkColor The colour used for un-visited links (i.e., those that have not yet been clicked-upon by the user). For example:
 
  document.linkColor = "red";
 
  will change the colour of all the un-visited links in a document to red.
 
  alinkColor The colour used for an active link (i.e., the one that was clicked-upon most recently, or is the process of being clicked). For example:
 
  document.alinkColor = "lightred";
 
  will change the colour of active links in a document to light-red.
 
  vlinkColor The colour used for visited links (i.e., those that have previously been clicked-upon by the user). For example:
 
  document.vlinkColor = "darkred";
 
  will change the colour of all the visited links in a document to dark-red.
 
  title The title of the document, as displayed at the top of the browser window. For example:
 
  document.title = "This title has been changed";
 
  will replace the existing page title with the text "This title has been changed".
 
    Click here to see this code in operation.
 
  (Note that some browsers do not display a title bar. On such browsers this code will have no effect.)
 
  forms An array containing all the forms (if any) in the document. It accepts an index number in the following way:
 
  forms[index-number]
 
  where index-number is the number of a particular form. Forms are automatically numbered from 0, starting at the beginning of the document, so the first form in an HTML document will always have the index-number 0.
  An example of the use of the forms property is given below, in the section on the form object.


Document methods include:

  write() Allows a string of text to be written to the document. Can be used to generate new HTML code in response to user actions. For example:
 
  document.write("<h1>Hello</h1> ");
document.write("<p>Welcome to the new page</p>");
document.write("<p>To return to the lecture notes,");
document.write("<a href='05_JS4.html'>click here </a></p>");
       
  will replace the existing page display with the HTML code contained within the brackets of the document.write() methods. This code will display the text "Hi, there!" and "Welcome to the new page", followed by a link back to this page.
  Note that all the HTML code within the brackets is enclosed within double-quotes. Note too that the link declaration ('05_JS4.html') is enclosed within single quotes. You can use either single or double quotes in both cases, but you must be careful not to mix them up when placing one quoted string inside another.
    Click here to see this code in operation.

The Form Object


When you create a form in an HTML document using the <form> and </form> tags, you automatically create a form object with properties, methods and events that relate to the form itself and to the individual elements within the form (e.g., text boxes, buttons, radio-buttons, etc.). Using JavaScript, you can add behaviour to buttons and other form elements and process the information contained in the form.


Form properties include:

  name The name of the form, as defined in the HTML <form> tag when the form is created, for example:
       
  <form name="myForm">
       
  This property can be accessed using JavaScript. For example, this paragraph is part of a form that contains the example buttons. It is the third form in the document (the others contain the buttons for the Window and Document object examples). To obtain the name of this form, we could use the following code:
 
  alert(document.forms[2].name);
 
  This code uses the document.forms property described earlier. Since this is the third form in the document it will have the index-number 2 (remember that forms are numbered from 0).
 
  Thus the code above will display the name property of the example form, which is simply "formExamples".
    Click here to see this code in operation.
 
  method The method used to submit the information in the form, as defined in the HTML <form> tag when the form is created, for example:
 
  <form method="POST">
 
  The method property can be set either to POST or GET (see under 'forms' in any good HTML reference book if you're not sure about the use of the POST and GET methods).
 
  This property can be accessed using JavaScript. For example, the present form has its method attribute set to "POST" (even though it's not actually going to be submitted). So the code:
 
  alert(document.forms[2].method);
 
  will display the method property of the example form, which is "POST".
    Click here to see this code in operation.
 
  action The action to be taken when the form is submitted, as defined in the HTML <form> tag when the form is created, for example:
 
  <form action="mailto:sales@bigco.com">
 
  The action property specifies either the URL to which the form data should be sent (e.g., for processing by a CGI script) or mailto: followed by an email address to which the data should be sent (for manual processing by the recipient). See under 'forms' in any good HTML reference book for more information on the use of the action attribute.
 
  This property can be accessed using JavaScript. For example, the present form has its action attribute set to "mailto:sales@bigco.com" (even though it's not actually going to be submitted). So the code:
 
  alert(document.forms[2].action);
 
  will display the action property of the example form, which is "mailto:sales@bigco.com".
    Click here to see this code in operation.
 
  length The number of elements (text-boxes, buttons, etc.) in the form. For example:
 
  alert(document.forms[2].length);
 
  will display the number of elements in this form (there are 22).
    Click here to see this code in operation.
 
  elements An array of all the elements in the form. Individual elements are referenced by index-number.
  Elements are automatically numbered from 0, starting at the beginning of the form, so the first element in a form will always have the index-number 0. For example:
 
  alert(document.forms[2].elements[0].name);
 
  will display the name of the first element in this form, which is the button labelled "Get Form Name". It's name is "get_form_name".
    Click here to see this code in operation.


Form methods include:

  submit() Submits the form data to the destination specified in the action attribute using the method specified in the method attribute. As such it performs exactly the same function as a standard 'submit' button, but it allows the programmer greater flexibility. For example, using this method it is possible to create a special-purpose 'submit' button that has more functionality than a standard 'submit' button, perhaps checking the data or performing some other processing before submitting the form.
       

Form events include:

  onSubmit Message sent each time a form is submitted. Can be used to trigger actions (e.g., calling a function). Usually placed within the <form> tags, for example:
       
  <form onSubmit="displayFarewell()">
 
  would cause the function displayFarewell() to execute automatically every time the form is submitted.


Text-boxes and text-areas

Each element within a form is an object in its own right, and each has properties, methods and events that can be accessed using JavaScript.

Text-boxes and text-areas have almost identical sets of properties, methods and events, so they will be considered together.

Text-box and text-area properties include:


  name The name of the text-box or text-area, as defined in the HTML <input> tag when the form is created, for example:
       
  <input type=text name="textBox1">
 
  The name property of a text-box or other form element can be accessed using JavaScript in the manner shown under the section on document.length, above.
 
  value Whatever is typed-into a text-box by the user. For example, here is a simple text-box:


  This text-box is named textBox1. Therefore, we can obtain any text typed into it using the following line of code:
 
  alert(document.forms[2].textBox1.value);
 
    Type something into the text-box, then click here to see this code in operation.
 

Text-box and text-area events include:

  onFocus Event signal generated when a user clicks in a text-box or text-area. For example, here is a simple text-box:


  This text-box was declared using the following HTML code:
 
  <input type=text name="textBox2" onFocus="alertOnFocus()">
 
  The function called alertOnFocus() displays an alert box, so clicking in the text-box above should trigger the function and cause the alert to appear.
 
  onBlur Event signal generated when a user clicks outside a text-box or text-area having previously clicked inside it. For example, here is a simple text-box:


  This text-box was declared using the following HTML code:
 
  <input type=text name="textBox3" onBlur="alertOnBlur()">
 
  The function called alertOnBlur() displays an alert box, so clicking in the text-box above and then clicking outside it should trigger the function and cause the alert to appear.


Buttons, Radio-buttons and Checkboxes

Buttons, Radio-buttons and Checkboxes have almost identical sets of properties, methods and events, so they will be considered together.

Button, Radio-button and Checkbox properties include:


  name The name of the button, radio-button or checkbox, as defined in the HTML <input> tag when the form is created, for example:
       
  <input type=button name="button1">
 
  The name property of a button, radio-button or checkbox can be accessed using JavaScript in the manner shown under the section on document.length, above.
 
  value The value given to the button when it is created. On standard buttons the value is displayed as a label. On radio-buttons and check-boxes the value is not displayed. For example, here is a button:


  This button is named button1 and has the value Original value, original label. We can change the value of the button, and hence it's label, using the following code:
 
  document.forms[2].button1.value = "New value, new label";
 
    Click here to see this code in operation.
 
  checked This property - which is used with radio-buttons and check-boxes but not standard buttons - indicates whether or not the button has been selected by the user. For example, here is a checkbox:


  This checkbox is named checkbox 1. We can determine whether it has been selected or not using the following code:
 
  if (document.forms[2].checkbox1.checked == true)
{
    alert("Checked");
}
else
{
    alert("Not checked");
};
 
  Try clicking on the check-box to select and un-select it, then click here   to see this code in operation.
 

Button, Radio-button and Checkbox methods include:

  focus() Give the button focus (i.e., make it the default button that will be activated if the return key is pressed). For example, here is a button that displays an alert when clicked:


  This button is named button2 and has the value Hello. We can give it focus using the following code:
 
  document.forms[2].button2.focus();
 
    Click here to see this code in operation. A dotted border should appear around the label on the button, indicating that the button now has focus. Pressing the RETURN key should now activate the button, causing it to display the alert just as if it had been clicked.
 
  blur() Removes focus from a button. For example, the code:
       
  document.forms[2].button2.blur();
 
    will remove the focus (indicated by the dotted line) from the button above. Click here to see this code in operation.
 
  click() Simulates the effect of clicking the button. For example, below is a button that has the following code:
       
  document.forms[2].button2.click();
 
    Clicking on this button will have the same effect as clicking directly on the button labelled 'Hello', i.e., it will display the 'Hello to you too' dialog box.


Button, Radio-button and Checkbox events include:

  onClick Signal sent when the button is clicked. Can be used to call a function. Probably the most frequently-used of all the button events (all the example buttons in this document use this method).
       
  For example:
 
 
  This button was declared using the following code:
 
  <input type=button name="button3" value="Click Here" onClick="alert('onClick event received')">
 
  The code onClick="alert('onClick event received')" will cause an alert dialog box to appear whenever the button is pressed.
 
  onFocus Signal sent when the button receives focus (i.e., when it becomes the default button, the one that is activated by pressing the RETURN key). For example:


  This button was declared using the following code:
 
  <input type=button name="button4" value="Click Here" onFocus="alert('This button is now the default')">
 
  The first time you click the button it will gain focus, and the alert will appear. However, if you click again, no alert will appear because the button still has focus as a result of the previous click. To make the alert appear again, you will have to remove focus from the button (e.g., by clicking somewhere else on the document) then restore it by clicking the button again.
 
  onBlur Signal sent when the button loses focus. For example:


  This button was declared using the following code:
 
  <input type=button name="button5" value="Click Here" onBlur="alert('This button is no longer the default')">
 
  Clicking the button will not cause the alert to appear because it will only give the button focus. However, if you remove focus from the button (e.g., by clicking somewhere else on the document) the alert will appear.


The Select Object

Selection-boxes behave in a very similar fashion to radio-buttons: they present several options, of which only one can be selected at a time. They also have a similar set of properties, methods and events.

The principal difference from a programming perspective is that selection-boxes don't have a checked property. Instead, to find out which option has been selected, you must use the SelectedIndex property.

  SelectedIndex Returns an integer indicating which of a group of options has been selected by the user. For example:


  This selection-box is named selectBox1. We can find out which option is currently selected by using the following code:
 
  alert(document.forms[2].selectBox1.selectedIndex);
 
    Click here to see this code in operation. You should find that the value of selectedIndex (as shown in the dialog box) varies from 0 to 2 depending upon which of the three items in the selection-box is currently selected.